Please message me and write "Free Shipping promo" to order

Sunday, November 20, 2011
MARERI Thankgiving Sale FREE SHIPPING
There's a lot of things I am thankful for this year and now this my way of giving back and saying thank you for all of my supporters out there. May the good things of life be yours in abundance not only at Thanksgiving but throughout the coming year

Please message me and write "Free Shipping promo" to order
Please message me and write "Free Shipping promo" to order
Saturday, November 12, 2011
How-To: U-Shaped Handle Purse

Vanessa of Little Big Girl Studio shares her tutorial for creating a stylish bag that uses plastic u-shaped handlesthat are readily available at your local craft store. I like that she shares not only the pattern for this particular great bag, but also includes pictures of other bags in which she's used the u-shaped handles in place of fabric handles denoted by the pattern. Her technique for attaching the plastic handles can be used on countless styles of bags, including the one for which she shares the pattern and how-to on her blog.
Friday, July 15, 2011
Baby Handmade Tutorials
How-To: Diaper And Wipes Clutch
THE BAPRON: A TUTORIAL


Introducing the Bapron! aka the "baby apron". I hope the name doesn't turn you off (I know it's hopelessly cheesy), but this bib is really cool! It provides a ton of coverage in the front, much like an adult apron, and ties in back with bias tape! It's easy to make-I can whip one out in less than 1/2 hour (I've made a dozen or so, so I'm getting pretty quick!), even with making the bias tape myself.

Here's the back view with the cute ties! love!

I do have to give a disclaimer-I didn't think of this on my own. (wish I was that cool) My good pal Aimee had a bib that I've always liked that she got in Japan-and so one day I finally


Would you like to make one (or a dozen) of these for your own cutie, or for gifts? Then click below for more details!
You'll need:
main fabric (a fat quarter is plenty)
Side Note: Fabrics shown above are L to R Giddy by Moda from sponsor Ribbon Retreat, Midwest Modern by Amy Butler, gorgeous Riley Blake Sweet Dots, from my sponsor Fabric Closet,
and Central Park by Kate Spain. (with Amy Butler polka dot trim)
flannel
fabric for bias tape, or store bought bias tape
thread, pins, sewing stuff
the FREE pattern (print at 100% scale, cut out and tape together on dotted lines.)
If you have issues downloading the pattern, feel free to email me for a copy. It's on Google docs and is free to download, I've had no issues myself as have lots of people, but don't hesitate to ask. It is free! Just please ask nicely, folks. Also, please don't request that I share the Google doc with you.
If you have issues downloading the pattern, feel free to email me for a copy. It's on Google docs and is free to download, I've had no issues myself as have lots of people, but don't hesitate to ask. It is free! Just please ask nicely, folks. Also, please don't request that I share the Google doc with you.
Please, for personal use only!
If you would like to make Baprons to sell, check out the Limited Commercial License to sell here.
If you would like to make Baprons to sell, check out the Limited Commercial License to sell here.


Ok. First things first, let's lay the fabric and flannel out, wrong sides together. Smooth it out so there's no wrinkles.

Fold in half, and lay your pattern on the fold, then cut it out.

Iron it to get any stubborn wrinkles out, then pin around the outside.

Using a long stitch, baste around the entire bib, close to the edge. (about 1/8")
Next:
1. Cut strips of fabric on the bias. I cut mine 1.5" wide. (more on width options at the bottom of the post) Cut four pieces, one 34" long, one 31" long, and two pieces 10" long.
You can definitely adjust the length of the bias tape around the arms (the 31" long piece) on the Bapron, I felt like it was too loose on the first few I made so I changed it for the others, and in this tutorial.
You can definitely adjust the length of the bias tape around the arms (the 31" long piece) on the Bapron, I felt like it was too loose on the first few I made so I changed it for the others, and in this tutorial.
2. Then iron the sides in 1/4".
3. Fold in half again and iron, creating your bias tape.
4. No step here...just admire your bias tape!?

Next, take your two 10" long pieces and pin them around the arm holes, enclosing the raw edges.

Then sew around the arm holes, close to the edge but making sure to catch the underside in your stitch.

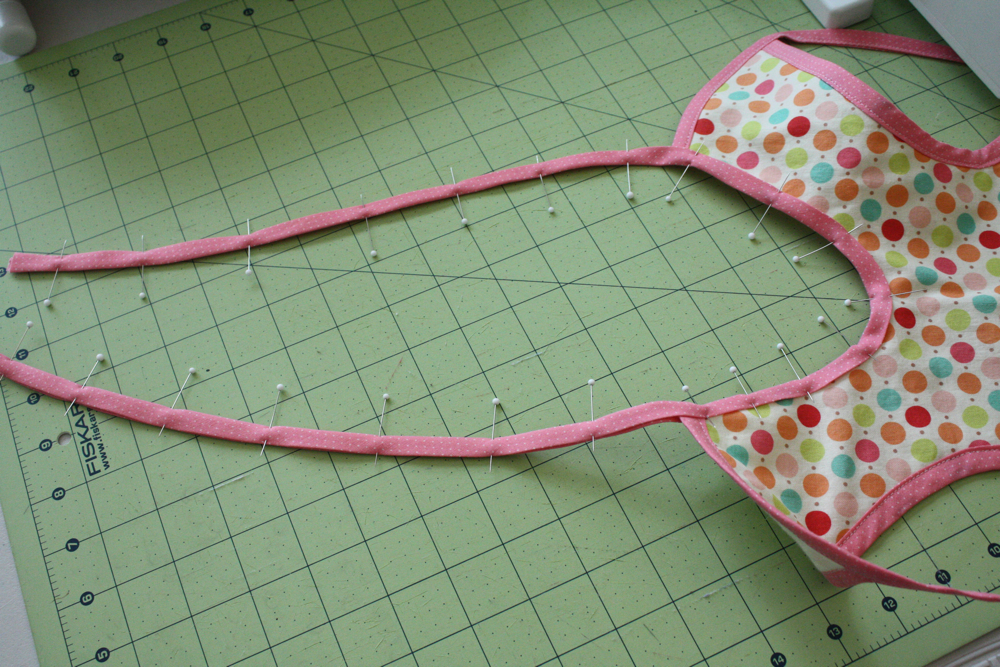
Next take the 31" long piece and start pinning at the shoulders like so...

Then fold your bib in half to find the middle, same for the bias tape.

Then pin the middles of the bias tape and bib together. Continue pinning around the sides...the bias tape is a tad shorter so it will curve to fit around the shoulder better.

Then starting at one end, sew around the entire thing close to the edge.

Then find the middle of of the 34" piece of bias tape and pin it to the center of the neckline and continue pinning the bias tape up and around it.

Also make sure to pin the ties, they can get squirrely if you don't!
Then, sew it up!
Tie a knot in the ends, apply a little fray check if you wish...

and Voila!
A handy bib that covers more than the usual bib. A bib that goes above the call of duty. A bib that will save your life! (too dramatic? ok, but it will save your kid's clothes...) A bib that deserves to be called....
The Bapron.

DUN dun dun....
so here are some various bias tape widths that I made some baprons in. You can check them out and decided what width you prefer.


Thanks for reading! Let me know if you have any questions or problems downloading the pattern! And major thanks to my hubby who figures out how to upload my patterns for me! and one more fabric source-the cute owls on the right in the pic above is MoMo It's a Hoot in Marshmallow from my sponsor Lark Cottons!
And of course I'd love to see if you make any-so add them pics to the flickr group if you do!
Post Edit: A question about the size came up in the comments, and I wanted to post here that it fits larger kiddos as well....it fits Sadie just fine, is a bit shorter on her but still fits! She's almost 3 and 30-ish lbs, so it works for a wide age range!


Oh yeah, Charlotte says hi.
This baby apron (or Bapron) from Jess of Craftiness is not Optional is a cute and practical project for wee ones. As Kelly at Oilcloth Addict points out, it would be especially nice if made out of a soft laminated fabric!
Sunday, April 3, 2011
NEW Tablet Sleeve by MARERI

Fits with original iPad / new iPad 2 models and Motorola Xoom
There are 6 layers of fabric plus entirely lined with 2 layers of sturdy THICK high-density foam padding to provide extra protection (not the ordinary white thin batting) between fabric layers to protect laptop computer from scratches and low-impact bumps.
The bag closes with a Velcro. Bird design on the front is made with felt appliqué.
CARE INSTRUCTIONS -
spot clean with mild detergent for light soiling and dry clean for heavy soiling.
The bag closes with a Velcro. Bird design on the front is made with felt appliqué.
CARE INSTRUCTIONS -
spot clean with mild detergent for light soiling and dry clean for heavy soiling.
Thursday, March 3, 2011
Pleated Fabric Flowers

Here's the latest trend on the textile front....You may have noticed these manipulated fabric flowers designs on pillows for the living room and bedroom accents. Here's a tutorial from craftaholicanonymous.com
happy crafting ....

TUTORIAL
you can makes these pleated fabric flowers in all sizes!
here's how:

1. cut a strip of fabric to be 2 inches by 24 inches. fold in half and sew wrong sides together.

2. get coordinating thread and a needle ready.

3. start at one end and fold the bottom {the edge with the seam} over to create a pleat. pinch with your fingers to hold in place.

4. sew a single stitch through the pleat to hold in place.

5. make another pleat next to the first pleat and sew a single stitch. repeat until you've made a "circle".

6. continue making pleats behind the first circle or layer. on the second layer, make the pleats slightly farther apart. *do not stitch layers together yet* don't worry if you're pleats aren't perfect! it adds to the character of the flower.

7. should look something like this.

8. when you've reached the end of your fabric strip, wrap layers and arrange how you want it to look. by doing it this way, you can easily adjust the size of the overall flower a little big bigger or a little bit smaller

9. sew the layers together and tuck under the unfinished edges at the beginning and end of your flower and stitch in place.
-if this is the size of the flower you want {approx 2"}, then proceed to step 10.
-if you want to make a larger pleated flower, skip to step 12.

10. cut a small circle of matching fabric {or felt, whichever you prefer} and hot glue to the back.

11. add an embellishment to the center- jewel, bead, rhinestone, button, etc. using hot glue. the attach pin, clip or whatever you choose to use it for.

12. cut a strip of fabric 3"x18" and repeat steps 2-5. {hide unfinished ends under pleats}

13. then layer the two pieces together and sew in place. then do steps 10-12. this makes approx 3" flower.

14. for giant pleated flowers (8"-9") like the one above i made for my Master Bedroom, you'll want to repeat steps 2-7 with fabric strips measuring 4"x44", then 5"x44" and then two 6"x44" strips. cut off any excess. then stack your layers starting with the smallest and hot glue or hand stitch in place depending on how you plan to use your flower. {like if you're putting on a plate like i did, hot glue is just fine. if you plan to put on a pillow, you'll want to hand stitch everything together}
Subscribe to:
Posts (Atom)